Paper Folding Tips for Paper Airplanes

This section is primarily for beginning folders, or those who always dreaded having to fold their school papers in half due to no knowledge of paper folding technique – BUT, there may be an idea or two an intermediate folder could learn. And as for pro folders, please read in case suggestions for additions can be made.
Before We Start
First off you need to look at the instructions carefully. Depending on the writer and the intended audience instructions can range from true "how to do it" instructions to a method of showing the design with no help on how to actually make it. The difference is that beginners want to know how but experienced folders want as short as possible writing to use as reference later. I personally tend a little in the middle but lean toward the later. As an engineer we are trained to keep design and manufacturing method separate. Hence the need for a section like this.
We need to learn a little more about working with our primary material, paper. Learning to work with paper can be more challenging then one would originally think. Some paper just will not work for paper airplanes due to either its texture (effects air flow on wings) or it strength/stiffness (bend-ability). For more information and paper comparison you can check out my section devoted to paper. But, even if the paper makes great airplanes doesn't mean it is problem free! Some is just hard to work with and some just won’t stretch enough to make a plane like the Lunar Hawk.
If we start with an airplane, even a classic dart, we first fold in half and then fold corners down to meet the center fold. And our corners don’t match! We know this is not good because “For a Good Flying Airplane Symmetry is Important”. Yes this is the cornerstone rule for paper airplane success. So, we look to see where we misfolded and yet everything seems good, it just doesn't line up. Although it would not occur to most people, the problem is the paper was not cut square at the factory (we are way too trusting of factory quality). If you have this problem note the brand because some are worse then others and consider changing next time you buy paper. But the planes will work fine, just try to fudge them a little to make as symmetric as possible. I mainly point this out as a warning that we can have issues to face before we even start.
Common Paper Issues
Other paper issues we will need to overcome include: difficulty in making a clean crease, fold unforgivness, excessive puffiness under folds, paper tear, and crinkling; and, are probably the most common five. These problems arise from working with a thin, fibrous, and stretch resisting material. This along with the fact that once stretched, paper doesn't return back to its original shape, make a challenging material to work with. But the art of paper folding dates back to almost the same time as its invention.
The first of these, difficulty in making a clean crease, can be demonstrated in an exaggerated way by looking at the bend in a piece of construction paper or some card stock. The crease doesn't make a nice straight line but looks like a row in a plowed field with little zigzags and fiber damage on both side of the crease line. Most copy/printer paper isn't bad enough to cause air flow problems and so the planes fly. But, paper with this problem will normally resist reversing a fold (folding to crease in one direction, then opening and folding in the opposite direction).
No matter how carefully we fold we are going to miss the mark a little sometimes. Many types of paper allow us to use our thumb and index finger to “roll” the error back in line, and some just won’t let us do so. Fold unforgivness strikes again. Even when we try to unfold and refold it just wants to fall back on the same old, wrong crease.
We finally get towards the end of our folding and notice that our plane won’t sit flat on the table top. There is a whole lot of puffiness under the folds. This is due to the fact that the paper doesn't stretch well. The folds in step 5 start pulling against the creases made in step 2. This pull results in puffiness. Where it really causes a problem is if it is different on each side. This causes different amounts of lift on each wing and thus a plane that spirals out of control.
When bending any material there is tendency to stretch in some areas and compress in others. Thin materials don’t compress well, instead they wrinkle. Most of these wrinkles can be smoothed out and don’t cause any problem. Over all this is more of a cosmetic problem then an actual functional problem. But they do need to be taken care of after each step and not allowed to accumulate.
The Solution!
Now that we have discussed the problem it is time to move on to the solution – folding tools. The use of folding tools is again almost as old as paper folding. Just like the origin of paper folding, the best tools are modeled from tools used for centuries in Japan. Some articles I have read implicate that the tools originated with makers of Kimonos and then adapted to paper. Wither silk cloth or paper was first, use of these tools has stood the test of time. The original materials for the tools were bone and bamboo . Bone folding tools are still made and sold today. Plastic substitutes are also available. All of these can be expensive; but, cheap or free substitutes can be found or made.
Before going any further, I want to point out you don’t absolutely need any tool but a good finger nail, the rest just make things easier. There are even some purist who will refuse to try any other folding tools. I personally believe they will be limited to the number of quality planes they can make; but they can skip the rest of this topic and jump to here.
For the rest of us who can use the help here are some useful tools:
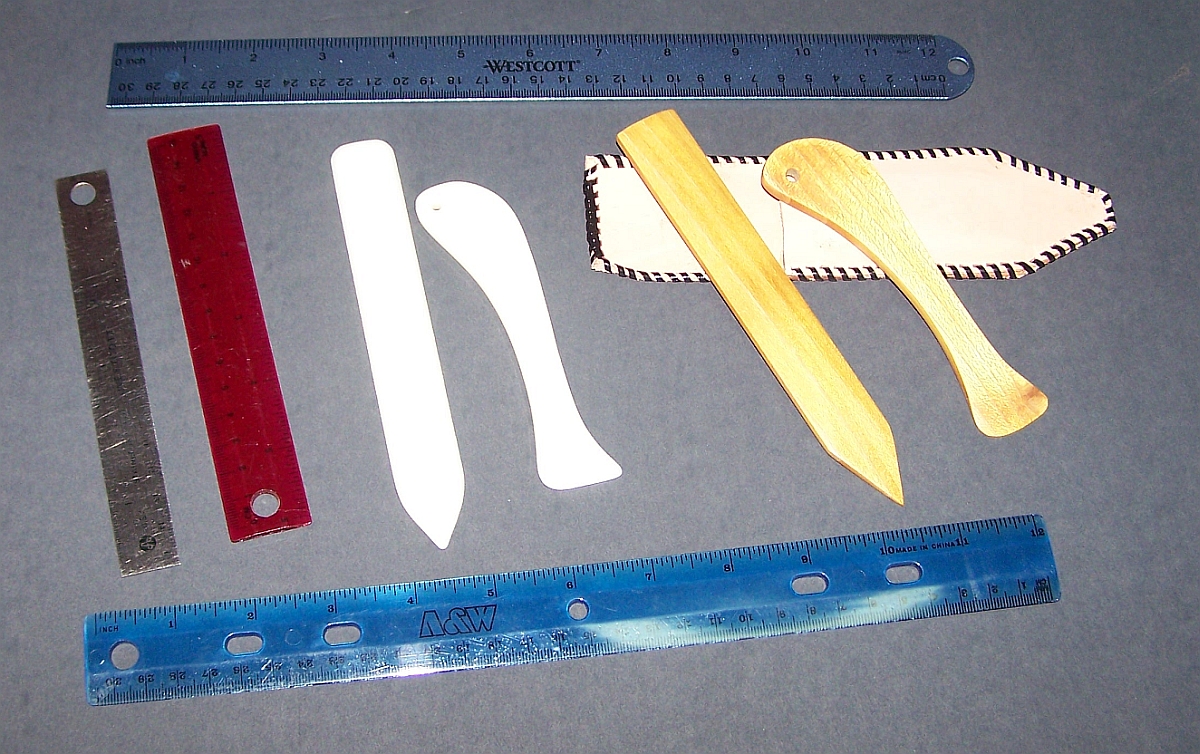
|
A. 12" Metal Ruler (Top) B. 12" Plastic Ruler (Bottom) C. 6" Rulers (Left) D. Plastic Folding Tools (Middle) E. Wood Folding Tools (Right) F. Sharp Pencil (Not Shown) |
Folding Tools:
A. 6” Metal Ruler. Less then 1” wide. Good as straight edge for folding wings up. Also for marking measurements.
B. 6” Plastic Ruler. Can be used as straight edge for bending as well as a suitable smoothing tool. Only problem is they tend to break too often and it is not as easy to find good cheap ones anymore.
C. 12” Ruler (Plastic or Metal). Great as straight edge for long bends but inconvenient for travel.
D. My first official folding tools. A plastic set that came with an origami kit. Curved smoothing tool is great but pointed tool did not have a flat face to allow it to be used as a straight edge.
E. Folding tools I made from Osage Orange wood (any hard closed grain wood can be used).
E. A sharp pencil. Necessary for planes requiring measurements. But, also very useful to those of us who have trouble seeing creases (those fold -- unfold -- fold to crease instructions). After making that first "Fold Paper in Half. Unfold." step if you use a sharp pencil to mark the center line you will be amazed at how mush over folding can be avoided. The same thing is true when it comes to tail folding. Many of us just cannot see that slight shadow that a crease makes.
|
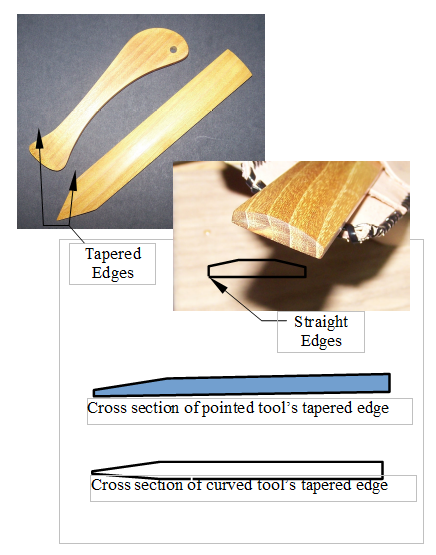
If you can make, or get someone to make for you, a set of folding tools here are some tips: Pointed tool has flat bottom to allow it to be used as straight edge for bending. The cross sectional profile is similar to that of a common wooden 12" ruler. The profile along the length has a single tapered face (on the Pointed side) to allow it to be used as a smoothing tool. Curved tool has a double taper going toward the edge. This allows it not only to be used for smoothing; but, it can be used vertically by sliding on a straight edge to leave a bending crease on thick paper and card stock. If you use as hard a wood as you can find they will last for years. Even an a wooden ruler can be used with nothing more than a sander to shape the tools. |
We are finally ready to talk about the actual folding. So lets start with making creases. It may seam so simple but if a crease is not correctly done there can be consequences later. Once folded the bend should be rubbed smooth and flat with the back of your fingernail, a ruler, or a smoothing tool. Without doing this it becomes difficult to unfold and the either refold or reverse fold later, essential steps in plane making. Where this can often lead to a problem is when we check out a completed airplane and start looking under the wing folds to see if all the parts are fully and properly tucked in and flat. If not we can end up with a plane that just spins out of control instead of flying.
To demonstrate the next set of tips we will do better using an actual plane as an example. Let’s make a Pentagon II. We will use this plane step by step, you may want to make a copy of the instructions as I am not going to repeat every detail here.
Remember the discussion that instructions could be "how to do" verses "most simplified"? A closer look at that is our next topic. Look at the diagram below:
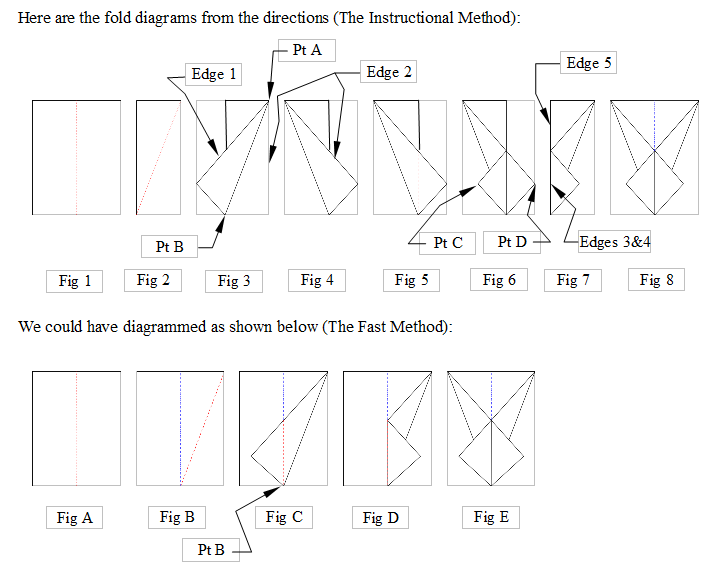
There are a few things bad about the "fast method". This method implies folding both left and right sides independently using the center crease as the only reference. Good luck with symmetry.
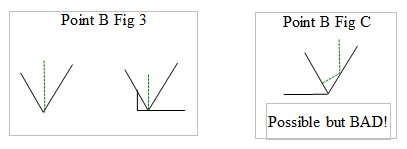
When we look at the step as shown in Fig. 3, we see that Point B can meet at the centerline (as shown on left) or it can fall short (as shown in center). But Point B can't be over folded past centerline without tearing the paper. It won't matter since we flip the paper over for the other side maintaining a symmetric plane. Now look further at Fig. C (as shown on right), Point B could so easily be over folded past center. This will make symmetry impossible.