My Paper Airplane Folding Aid
Just what is this Paper Airplane Folding Aid? If your project requires making small adjustment to folding dimensions (maybe even angles); then, a board to help speed up measuring could be very helpful. Many crafting people have soft plastic mats to work on for various projects, but these are expensive. If all you need is a way to mark dimensions or angles, and not a cutting pad, this aid is for you -- cheap and customizable.
Safety Warning: The instructions on this (and other projects pages) show the use of sharp knives, saws, and other tools requiring experienced use and knowledge of how to safely use them. Since I have such a wide range of readers in age and experience I feel the need to add this warning. If you do not have any experience with how to safely use any of these tools get help! There are always alternate ways to accomplish the task. Scissors used instead of knives, etc. The point is to stay safe and have fun!
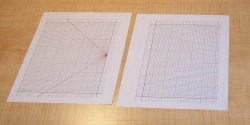

1. Download the grid1.zip(Here). If Libre Office is available open grid1.odt and print
out sheets 1 & 2. Use a ruler or scale to verify that the size is correct. Make sure you print without scaling or resizing
(100%). Note: Test on the same paper as your final print because paper
thickness can cause a change in print dimensions. Also included in the zip is a pdf file ,that can be printed, and the Inkscape svg files which can allow you to customize the grid.
Printing the pdf file does not seem to come out as sharp for me as the odt file. Both Libre Office and Inkscape are free and even portable see here.
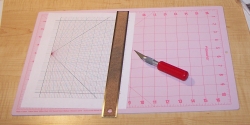
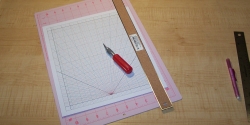
2. Gather up the rest of the supplies including: cardboard or poster board to use as a backing, X-acto knife or
scissors, a straight edge and a glue stick (I use restickable type for this project). Once the sheets are printed
decide if you need to add any special marks that are not currently on the sheet (such as a certain paper airplane
folding angle). You can optionally add a couple of very light coats of hairspray to give some protection against
smearing the lines. If you are going to coat it with hairspray do it now before gluing and make sure it is very
light coats since hairspray will dissolve many brands of glue and types of ink (good to know if an ink pen leaks
in your pocket).
3. Trim the sheets along the outer boundary lines.
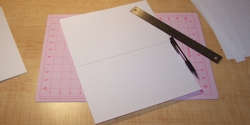
4. Make a line at the middle of your poster board sheet or cardboard to align the two printed sheets.
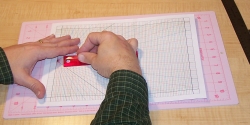
5. Apply glue and attach each half of the printout to the poster board aligning the trimmed edges to the center
mark on the poster board.
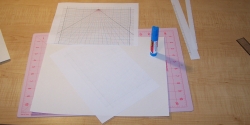
6. Use your fingers and a ruler to gently straighten and flatten each sheet on the poster board (why I use restickable0.

7. Place sheet between two layers of wax paper or plastic wrap and apply weight to flatten while the glue
dries.
8. Trim the finished sheet to just a little larger than the grid marks.
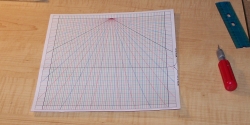
9. Finished project. You can now use the paper airplane folding aid to quickly fold your a paper airplane without
having to measure and mark each plane. This works great if you are making small adjustments to a certain folding
dimension to test how each paper airplane design version flies.
